Sunday, February 9, 2014
Hello!!
Manda Panda has had a busy year of moving from Virginia Beach to Richmond and I am currently not teaching any classes at the moment. I am, however, still painting. If you would like to view the body of my work, please see links to the right of this post. Currently, there is barely any of my own work posted below. Thanks for looking! And if you would like to hire me to paint for you, my email is also listed on the right.
Tuesday, March 6, 2012
Art Classes Start Next Week!
I am very excited to announce that I will once again be "wearing" my art teacher hat and will be teaching classes in my home as early as next week. There are various classes available for various ages. Below is a brief description of each. Message me at artbymanda@gmail.com if you are interested in joining us. A session lasts roughly nine weeks. Material fee is due the first class and then you will be billed at the end of the month for the classes you attended. Make-up classes can be scheduled if your child has to miss. You DO NOT pay for a class you are unable to attend!
Pre-K and Big K (ages 3-5ish) - Alpha ART – learn about art in alphabetical
order! Special emphasis on learning
letters, phonics and writing. (We will
learn up to three letters per class) 9 week session. Mondays 10:30-11:30 (three spots left);
Fridays 9:30-10:30 (four spots left).
*Group rate for Pre-K is
$10 per child for an hour lesson.
*Add in a sibling for $8.
*There is an initial materials fee of $20 per child for
group lessons per session.
Elementary Class (ages 6ish to 10) – Really, Really OLD Art – learn about ancient
cultures and how and why they created art.
Make art that looks old and in the style of those ancient artists. 9 week session. Tuesdays 1:30-2:30 (two spots left);
Fridays 10:45 – 11:45 (two spots left).
*Elementary (both lower and middle ages) is $10 per child
for an hour lesson. *Siblings are
$8. There is an initial materials fee
of $30 per student, per session. *Each
child will receive a sketchbook to keep and use in class and at home.
Upper Elementary – Early Middle (ages 10-12ish) – Painting – Learn about various famous painters
and how and why they painted. Learn how
to use different paint mediums and how to begin and then successfully complete
a painting. 9 week session plus make-up dates.
Thursdays 10:30-11:30 (six spots left)
*Upper Elementary and Middle age group is $12 per child
for an hour lesson. *Siblings are
$10.
*Supply fees are to be determined and will depend on the
focus of each session. Most supplies
for this level will be given to the student to keep and bring with them to
class.
Middle School (ages 12-14) - Painting – Learn about various famous painters
and how and why they painted. Learn how
to use different paint mediums and how to begin and then successfully complete
a painting. 9 week session plus make-up
dates. Thursdays 3:30-4:30 (four spots left).
*Upper Elementary and Middle age group is $12 per child
for an hour lesson. *Siblings are
$10.
*Supply fees are to be determined and will depend on the
focus of each session. Most supplies
for this level will be given to the student to keep and bring with them to
class.
Monday, November 7, 2011
Birthday Owls
Happy Birthday to my beautiful and crazy little niece, Brighton. Here is an owl painting for your new room. Can't wait to see you and deliver this in person! I love you!

"Asleep on the Job" 30x12, Acrylic on Canvas

"Asleep on the Job" 30x12, Acrylic on Canvas
Thursday, August 11, 2011
Peacocks, Squirt Bottles and Painting with our Hands!
One of our other art projects this summer was inspired by a trip to the zoo and one very forward peacock with no sense of personal space. We visited the zoo after hours one night for a member's only party. The peacocks were not happy about the amount of people wandering around during what is usually their time to roam and rule the park. This peacock almost jumped onto Matt's shoulder from a nearby fence, giving me a great idea for what the next art project would be!


For the mermaid, I drew the body, Callie colored the hair, skin and tail with crayons, we did the tissue paper application using different colors of blue and we used a shell and yellowish paint to stamp the sea bottom.


And here are our peacocks (which my Callie pronounces as "poococks")


I love working with bleeding tissue paper because the colors are so vivid and it leaves a nice implied texture on the paper. Kids love bleeding tissue paper because it gives them an excuse to use a squirt bottle!
Materials:
*large white paper
*smaller piece of turquoise or blue paper (I used fadeless, but you could use construction paper)
*small scrap of orange or yellow paper for the beak - cut into a long triangle
*permanent marker
*white crayon
*orange marker or crayon
*bleeding tissue paper in blues and greens, torn into strips (make sure it is labeled as bleeding because not all tissue paper bleeds - a lot is manufactured to prevent bleeding)
*orange and blue paint (we used tempera)
*glitter (we used green)
*glue
*googly eyes
*squirt bottle filled with water (you could also use paint brushes and water to adhere the tissue paper. I only recommend the squirt bottle for a small group. For a class of 24 I used paint brushes since I didn't want it to look like a freak indoor rain storm had occurred!)
*newspaper or something else to cover the table. Bleeding tissue paper does stain so take precautions if you don't have an easy to clean surface. And don't forget the art smocks!
There is some drawing and cutting that you have to do for the child depending on the age you are working with. I did this with pre-school age so just adapt the instructions accordingly.
1. Draw two bird feet and legs at the bottom of the page with permanent marker (so it won't run once the paper gets wet) and the "bottom" of the bird so that they have a stopping point for feathers and other future steps. Have the child color in the legs and feet.


2. Using a white crayon, have the child draw lines from the "bottom" line up and out, like a fan. These are the "veins" in the feathers and the wax in the crayon will resist the color and show through.
3. Squirt the paper with water from the "bottom" of the bird up. Lay strips of tissue paper in a fan shape all over the wet part of the paper. Continue to squirt tissue paper making sure that all pieces are wet. Leave to dry for about 10 minutes. I also used a hair dryer to speed drying time along. It doesn't have to be completely dry, just moderately and the paper needs time to absorb the color.

4. Remove the tissue paper and throw away. Hands will turn green and it doesn't wash off immediately.
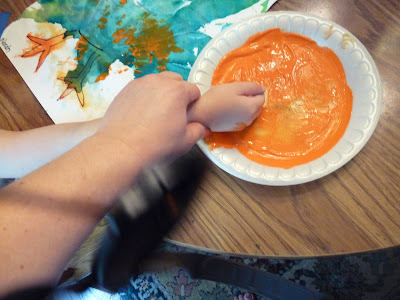
5. Using orange paint and the side of your fist, stamp where the "eyes" in the feathers should be.


6. Now use the blue paint and thumbs or fingers to stamp in the center of the "eyes".


7. Draw and cut out the body shape from blue or turquoise paper. Its is basically the shape of a bowling pin.

8. Glue the body on top of the feathers, lining up the bottom of the body to the "bottom" line that you drew in the first step.
9. Cut a little triangle from orange or yellow scrap paper and glue on the head of the peacock for the beak.
10. Add the googly eyes.
11. And now for the glitter! I give very little free reign when working with glitter. Draw circles around the "eyes" of the feathers using glue (clear drying, of course). This step I did for the kids. Shake the glitter out onto the glue lines, wait for a minute or two, and then tip the paper over onto another piece of paper to get all the loose glitter off. I always put the excess glitter back into the bottle. I pretty much did this entire step myself except that I let the kids hold the glitter bottle and I guided their hands on where to shake it out. Glitter brings out the inner beast in any child so, if left unsupervised, the entire paper, that room and most others in your house, will be glittery green!

Proud as a peacock!
I also adapted this project to make other pictures for Callie to give as gifts:

For the mermaid, I drew the body, Callie colored the hair, skin and tail with crayons, we did the tissue paper application using different colors of blue and we used a shell and yellowish paint to stamp the sea bottom.

For the flowers, I drew the basic shape, Callie colored pretty much wherever with crayon, we did the tissue paper application using pinks and reds and then we stamped the center of the flowers with a foam circle stamp.
Tuesday, June 7, 2011
Art Zoo Project - Colorful Cats
Here is the first of hopefully MANY project ideas for those creative little creatures of yours that need an outlet for their artistic endeavors. As you can see, my little creature, left to her own devices, just creates mud puddles and body art...


...so, today's art zoo project were these Colorful Cats made out of paper lunch bags. Cats are a favorite subject for kids, and my little one LOVES her fuzzy brothers. If you want to tie in a book to the project, you could read one of the Skippyjon Jones stories, some of my favorites! If you want an art tie-in, google the crazy colored cats of Andy Warhol or the mischievous florescent green cats "Radioactive Cats" in the photography of Sandy Skoglund.


Materials we used:
-Tempera paint
-paper lunch bags
-newspaper (to stuff inside)
-googley eyes
-ribbon
-foam scraps (for nose)
-construction paper (for tails)
This project is simple and you can substitute other materials. You can paint on the eyes or use buttons or paper scraps. You can even have them color the bags with crayons first. You could use textured surfaces and do crayon rubbings to create stripes or the look of fur on the cat. The hard part is painting the bag, if you choose to paint it. It is messy and it will get all over your child's hands and probably the table. We painted all sides at once and then hung them up to dry by paper clipping them to a wire hanger from the door frame. If you are a neat nick, you could flatten the back and paint sides a little at a time. I also used a hair dryer to speed the drying process. You could also cover the table with paper first, something I completely forgot to do, but, tempera washes off. And my kid chooses to paint the table more than her project anyway! After the bags are dry, ball up two pieces of newspaper, shove them into the head part and squeeze the neck (so violent!) Tie off the necks with some ribbon or yard, or whatever you have. You could even create a little tag for the cat and attach that to the "collar". Spread out the bottom of the bag and it should stand on its own. Cut out tails and staple or glue to the back. Glue on noses (upside down triangles) and eyes. For the ears, peel back two corners from the bottom of the bag (now the top of the head.) Once those corners are nice and dry, they should stand up pretty well. Name the cat something cute and keep it forever, or at least until the dog gets it!
Monday, June 6, 2011
Welcome to Manda Panda Art!
Welcome to Manda Panda Art! This blog is one of two blogs meant to replace my webpage http://www.catinthelapstudio.com , which will be disabled very soon, and this site is where I will post updates on all my children's art from now on. Webpages are expensive and irritating for this busy mommy and artist to maintain. My other blog, http://catinthelapstudio.blogspot.com , will become my main page and will become Art by Manda. I have also decided to eliminate the confusion my business name causes (Cat in the Lap Studio) since it does not include my name and can bring up some very questionable things if typed into a search engine! So I am changing everything to Art by Manda with Manda Panda Art being a division under it so that I can keep my children's art separate.
I am also using this site for another exciting purpose - art education - my other passion. I know how hard it is to be a mommy and be home with a wild one and need something to occupy her inside. Even with tons of art materials at our fingertips, we still get bored and stuck in the humdrum of daily routine. So I will be using this site to feature art activity ideas that can easily be done at home. Most of the ideas are for younger kids but all are fun for any age, just maybe not as challenging for older kids. If you don't want to make the mess at home, join us at the "art zoo" (my dining room!) and we can make the mess together. I offer art lessons for children for an affordable fee.
Subscribe to:
Posts (Atom)