And here are our peacocks (which my Callie pronounces as "poococks")
I love working with bleeding tissue paper because the colors are so vivid and it leaves a nice implied texture on the paper. Kids love bleeding tissue paper because it gives them an excuse to use a squirt bottle!
Materials:
*large white paper
*smaller piece of turquoise or blue paper (I used fadeless, but you could use construction paper)
*small scrap of orange or yellow paper for the beak - cut into a long triangle
*permanent marker
*white crayon
*orange marker or crayon
*bleeding tissue paper in blues and greens, torn into strips (make sure it is labeled as bleeding because not all tissue paper bleeds - a lot is manufactured to prevent bleeding)
*orange and blue paint (we used tempera)
*glitter (we used green)
*glue
*googly eyes
*squirt bottle filled with water (you could also use paint brushes and water to adhere the tissue paper. I only recommend the squirt bottle for a small group. For a class of 24 I used paint brushes since I didn't want it to look like a freak indoor rain storm had occurred!)
*newspaper or something else to cover the table. Bleeding tissue paper does stain so take precautions if you don't have an easy to clean surface. And don't forget the art smocks!
There is some drawing and cutting that you have to do for the child depending on the age you are working with. I did this with pre-school age so just adapt the instructions accordingly.
1. Draw two bird feet and legs at the bottom of the page with permanent marker (so it won't run once the paper gets wet) and the "bottom" of the bird so that they have a stopping point for feathers and other future steps. Have the child color in the legs and feet.
2. Using a white crayon, have the child draw lines from the "bottom" line up and out, like a fan. These are the "veins" in the feathers and the wax in the crayon will resist the color and show through.
3. Squirt the paper with water from the "bottom" of the bird up. Lay strips of tissue paper in a fan shape all over the wet part of the paper. Continue to squirt tissue paper making sure that all pieces are wet. Leave to dry for about 10 minutes. I also used a hair dryer to speed drying time along. It doesn't have to be completely dry, just moderately and the paper needs time to absorb the color.
4. Remove the tissue paper and throw away. Hands will turn green and it doesn't wash off immediately.
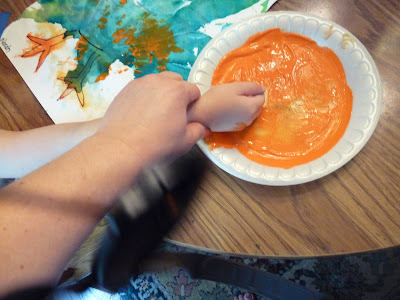
5. Using orange paint and the side of your fist, stamp where the "eyes" in the feathers should be.
6. Now use the blue paint and thumbs or fingers to stamp in the center of the "eyes".
7. Draw and cut out the body shape from blue or turquoise paper. Its is basically the shape of a bowling pin.
8. Glue the body on top of the feathers, lining up the bottom of the body to the "bottom" line that you drew in the first step.
9. Cut a little triangle from orange or yellow scrap paper and glue on the head of the peacock for the beak.
10. Add the googly eyes.
11. And now for the glitter! I give very little free reign when working with glitter. Draw circles around the "eyes" of the feathers using glue (clear drying, of course). This step I did for the kids. Shake the glitter out onto the glue lines, wait for a minute or two, and then tip the paper over onto another piece of paper to get all the loose glitter off. I always put the excess glitter back into the bottle. I pretty much did this entire step myself except that I let the kids hold the glitter bottle and I guided their hands on where to shake it out. Glitter brings out the inner beast in any child so, if left unsupervised, the entire paper, that room and most others in your house, will be glittery green!
Proud as a peacock!
I also adapted this project to make other pictures for Callie to give as gifts:
For the mermaid, I drew the body, Callie colored the hair, skin and tail with crayons, we did the tissue paper application using different colors of blue and we used a shell and yellowish paint to stamp the sea bottom.
For the flowers, I drew the basic shape, Callie colored pretty much wherever with crayon, we did the tissue paper application using pinks and reds and then we stamped the center of the flowers with a foam circle stamp.


